Now that you are done configuring and designing your campaign, it's time to publish and share with your audience! Before sharing that link, take a quick look at some of the important areas below to ensure that your campaign is ready to go and won't have you editing it while it is live.
1. Terms & Conditions
If you are using a campaign that involves prizing or giveaways, you will need to work with your legal team well in advance of launching to come up with detailed contest rules or Terms & Conditions. The most important information to include is the specific dates of the contest, the prize value, requirements or eligibility to participate and any other relevant info from your legal team.
- Include your official rules under General Setup:
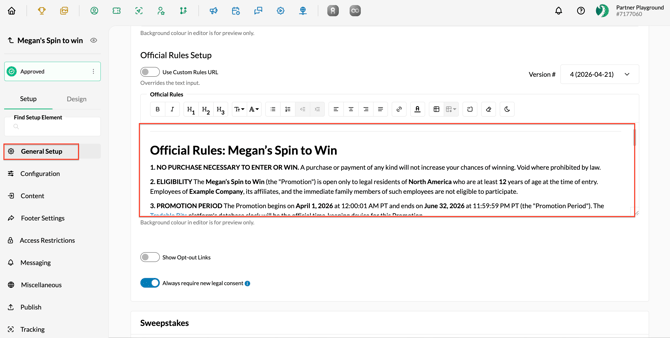
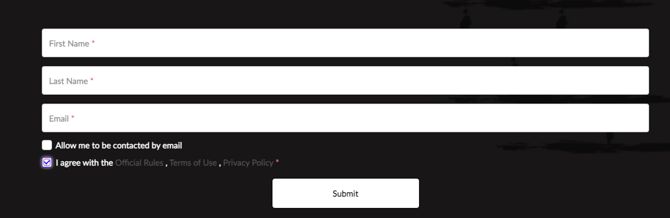
Fans will be required to accept the Official Rules to enter:
2. Date Range
Be sure to check that you have the correct date ranges under General Setup. Campaigns will close automatically at the set end time, regardless of how long it has been live or how many entries you have collected.
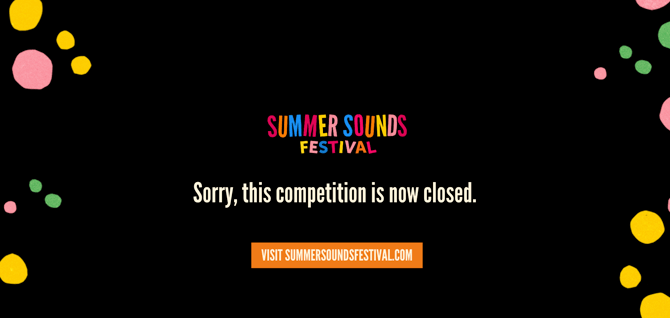
Please make sure that you have populated the Contest Over page in the setup section, as this is what fans will see when they visit after the campaign has closed.
3. Maximum Entries
There are two different types of entry limits that you can set, and you will want to be sure that you have differentiated them before you launch your campaign.
- Fan Entries: This is the limit put on each individual fan. Keep this toggled off if you wish to have unlimited entries per fan.
- Total Campaign Entries: This is the total number of entries that the campaign will accept. Once this limit is reached, the campaign will close automatically, regardless of the end date. This is not related to individual entries per fan. Do not put "1" in this field unless you are sure that you only want to collect a single total entry for the entire campaign.
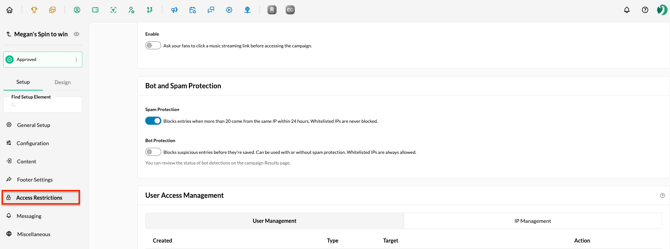
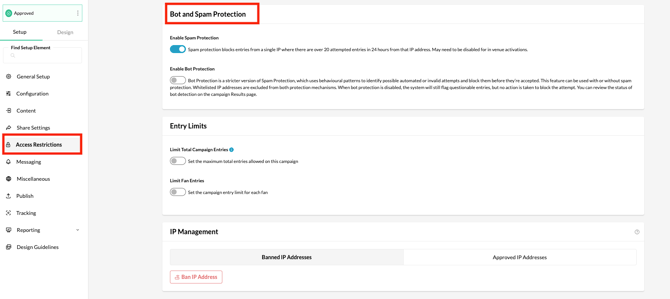
4. Bot & Spam Protection
Spam Protection blocks entries from a single IP where there are over 20 attempted entries in 24 hours from that IP address. This may need to be disabled for in-venue activations where you are having thousands of fans engage in a short period of time under one roof. Check your Spam Protection settings under Setup>Access Restrictions.
5. Age/Location Requirements
If you want to run a campaign that is only open to residents of a particular country or province/state, you can configure regional restrictions that will gate this campaign based on a user's IP address.
If you're partnering with alcohol or tobacco brands for a campaign, you will need to use an age gate to verify that a fan is legally eligible to enter.
If you are using the age gate functionality at the start of your campaign, it will only allow fans to proceed if they are verified against the age minimum that you have set for the campaign. This information will be stored so that any returning fans will not have to verify through the age gate on additional entries.
Please note that across the platform, we do not accept entries or collect data for anyone that is 13 years of age or younger to remain compliant with data collection laws. This means that if you have a Date of Birth field, no entries will be accepted if that field shows an age of 13 years or younger, even if an adult is entering on a child's behalf.
More information on this here.
Both age and location requirements can be configured under your campaign's Access Restrictions section.
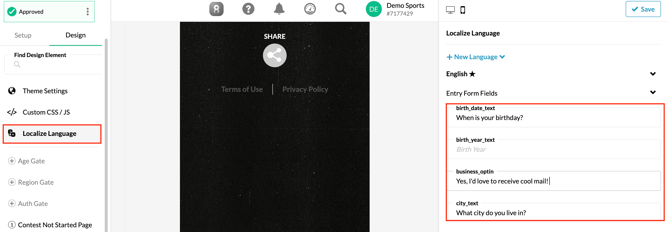
6. Localize Language
If you know that your audience may speak different languages, you'll want to visit the Localize Language section in your campaign editor to add additional language options. From here, you can further customize the default campaign text to better match your brand or audience. You can also use this section to change the text of buttons and other campaign fields regardless of the number of languages you are using. We recommend editing the email and phone opt-in fields to personalize them more to your brand voice. For more information, visit this guide on localized language.
7. Entry Fields
If your goal is to learn more about your fans through a campaign, configuring the right entry fields is the most important part. Give your entry fields a final scan under General Setup to make sure you are set up for success in capturing the most relevant fan data with this campaign. If you change your mind and want to remove any of your entry fields, simply click the X icon to the far right.
While you cannot edit any of the fields here, you can edit the response options of an entry field by navigating to Fan CRM > Core & Custom Fields. From here, you can find your field and edit the response type. 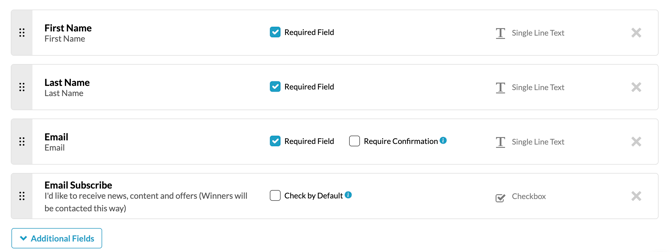
More info on editing entry fields here.
8. Set your Domain/Campaign URL
As a best practice, we recommend always setting up a virtual domain so that the URL that your fans click will be fully branded to something that your audience expects, rather than saying https://tradablebits.com/tb_app/12345.
To do this, go to the Miscellaneous Tab of your Campaign Setup and scroll down to the Domain/Share/Namespace section. If you don't have any virtual domains set up on your account or would like a new one added, please contact your Customer Success Manager.
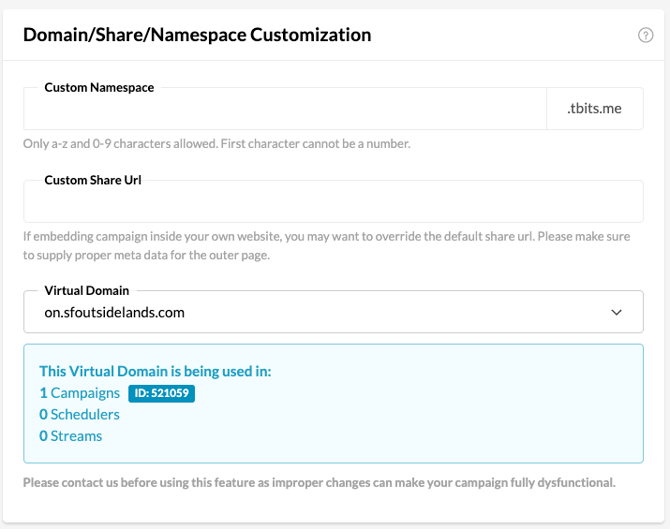
Here's a guide on setting up a virtual domain with your web team.
9. Share Image/Copy
Both setting a share image and setting up a virtual domain go a long way in creating a fully branded experience that resonates with your fans. This is the image that will appear with the metadata when one of your fans shares your campaign through SMS, email or on social media. You can configure this under the Footer Settings section.

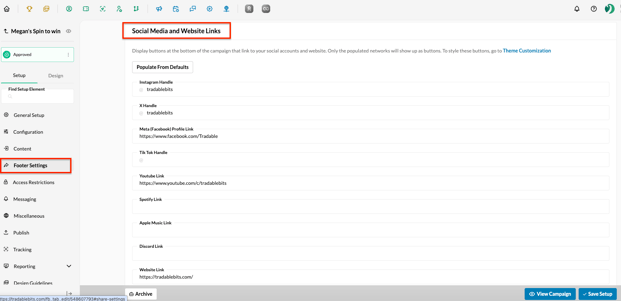
10. Social Media and Website Links
Don't miss a chance to add your social media links and website URL! Edit these under the Footer Settings. The links you enter here are displayed at the bottom of your campaign as buttons. If you'd like to customize or style the buttons, you can do this from the Theme Customization section.
11. Merchant Product Grid
Scrolling down past the Social Media and Website Links section of the Footer Settings, you'll find the Merchant Product Grid. If you have a merchant integration, like Shopify, synced with your Tradable Bits account, you can use the Merchant Product Grid to feature your products directly from the footer section of your engagement campaigns. For more on how to set this up, check out the guide here.
12. Automated Emails
Did you know that you get up to 100,000 emails as part of your Tradable Bits subscription? As a final touch on your campaign, you can easily set up an activity-based automated email to trigger when a fan completes your campaign. Use this to follow up with a thank you, CTA, special promotion or next steps to keep your fans engaged!
More info on auto emails here.
13. QR Codes
Every time you create a Tradable Bits campaign, our system will automatically generate a unique QR Code that you can download. This is great for in-venue activations, such as on jumbo-trons or signage to reach your fans at other touch points. You can also fully customize your QR code to match your branding. You can find your QR Code under the Publish section of your campaign or in the Tracker section of the platform.
More info on branding your QR Code here.

14. Test your campaign
Now that your campaign is built and ready to go, it's important to test it out before it goes live to your audience.
Please note: the live preview button shows you what the campaign looks like live, but it does not show you what the campaign looks like when it closes.
Some key things to test:
- Change your end dates and entry limits to see what your Contest Over page looks like (some campaigns will default to showing results on this page)
- Test on mobile and desktop devices
- Test on different browsers
Need more advice or guidance before publishing your engagement campaign?
Please reach out to your Customer Success Manager or contact support@tradablebits.com for further assistance.