While names, emails and phone numbers of fans are great pieces of information to have about your fans, there are ways to be creative and get a little bit more information from them if done well. Information such as their likelihood to buy a car in the next 3 years might be a great asset for your sponsors, or maybe you want to know which song they really liked from your recent album so that you can send them some custom swag. Sounds awesome, how do we actually do it? Custom Fields!
Custom Fields are additional pieces of information you can collect from your fans when they interact with your campaigns. To learn more about how to add a custom field to your data capture form, click here.
Managing Custom Fields
In order to view and manage the custom fields you've created so far, you can do so by hovering over the Fan CRM section in the Top Navigation Bar and clicking on Core and Custom Fields.
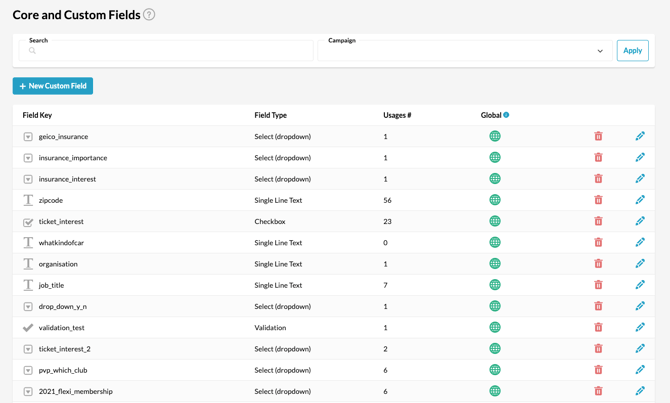
If you would like to view only the fields that are used in any particular campaign, you can choose the campaign from the dropdown at the top and click "Apply" to view only the custom fields used in that campaign.
For each custom field, the field key is listed, alongside the field type, the number of times the field has been used across campaigns, and whether the field is a global field. Global Fields are visible on fan profiles and are searchable within the Fan CRM.
To edit an existing custom field, simply click on the pencil icon next to the corresponding custom field and make the desired changes. Custom fields can be deleted by clicking on the trash icon next to the respective fields.
Creating Custom Fields
Custom fields can either be created in the campaign setup as shown here or within the Custom Fields page.
You can access the Custom Fields page by hovering over the Fan CRM section in the Top Navigation Bar and clicking on Core and Custom Fields.
Once on the page, click on + New Custom Field.

On the "Custom Fields Details" modal pops up
-> select a "Field Key" which is the unique identifier that will be used across the platform to identify this custom field type. (The Field Key should only consist of lowercase letters, numbers and underscore)
-> Choose a field type from the dropdown.
-> Depending on the field type you select, you may need to enter "Suggested Options" (eg. a list of answers for your dropdown menu or checkboxes). Each option will have to be entered on a separate line.
-> If you would like for the custom field to be available platform-wide, and not just at the campaign level, toggle the "Global" option.
Still need assistance? Please reach out to your Customer Success Team or contact support@tradablebits.com