Stay top of your fans' minds in new ways and drive higher fan retention
Fans are spoiled for choices these days and their social feeds are getting busier than ever. While traditional social networking tools are still great tools to use to advertise to fans, marketers today are constantly searching for new ways to get directly in front of their fan's eyes. Enter, browser notifications. Browser notifications are delivered to a user's desktop or mobile screen anytime they have their browser open — regardless of whether or not the user is on the website.
Overview
1. From the Tradable Bits Homepage, click on Push Notifications under Messaging to begin
2. Select Push Campaigns from the menu on the left
3. The top of the screen displays two stats: The first titled "Subs" refers to the number of fans that have subscribed to your browser notifications and the second titled "Campaigns" refers to the number of Browser Notification campaigns you have setup/run on your account

4. The Campaigns section provides an overview of the campaigns that you have setup/run.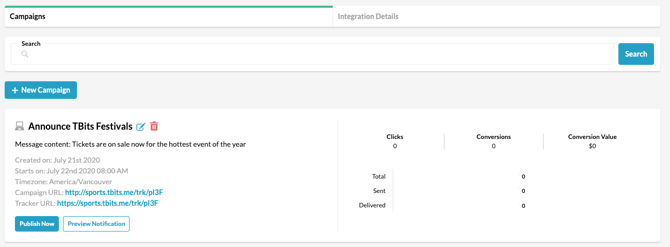
5. The Integration Details section houses information about how to setup the browser notifications by embedding the specific code on compatible webpages (more details on this below)
Creating a New Campaign
To create a new browser notification campaign to push to your fans, follow the steps outlined below
1. Click on "New Campaign"
2. Fill in the campaign fields and hit Save

3. Fill the following fields
- Campaign Name: Enter a unique name that will help you keep track of the Campaign that you are planning to run
- Message Content: Enter the message that you would like displayed to fans as part of the notifiaction
- URL Link: The Link that you would like to direct fans to. This is an optional field.
- Start Date: The Date when you would like the campaign to start running
- Start Time: The Time when you would like the campaign to start running
- Time Zone: The Time-Zone to use for configuring the Start Date and Time
- Persistent Notification Toggle: If you would like to send the notification as a persistent notification then toggle this on. This notification will need explicit action from the fan before it disappears from their browser. While it helps capture attention, it might also overwhelm your fans and seem highly intrusive. Please only use this if it is absolutely necessary to do so.
Code Configuration
Browser notifications are quick and easy to set up but will require access to your website's codebase. Head to the Integrations Details tab to get started.
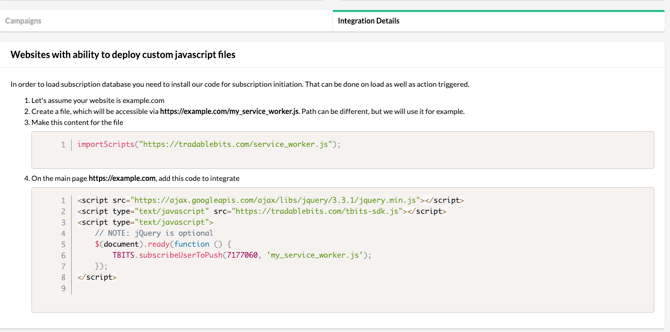
For websites that have the ability to deploy custom javascript files, you'll need to take the following steps.
1. Let's assume your website is example.com
2. Create a file, which will be accessible via https://example.com/my_service_worker.js. (The path can be different if needed)
3. Copy and paste the first script and make it the content for the file you created
importScripts("https://tradablebits.com/service_worker.js");4. On the main page (https://example.com), add the following second code from the integrations tab
<script src="https://ajax.googleapis.com/ajax/libs/jquery/3.3.1/jquery.min.js"></script>
    <script type="text/javascript" src="https://tradablebits.com/tbits-sdk.js"></script>
    <script type="text/javascript">
        // NOTE: jQuery is optional
        $(document).ready(function () {
            TBITS.subscribeUserToPush(1001, 'my_service_worker.js');
        });
    </script>
For websites that do not have the ability to deploy custom javascript files, you can still initialize the subscription action by utilizing Tradable Bits' virtual domain and by installing alternative code to your website to trigger the subscription prompt. Scroll down to the bottom of the integrations tab to find the provided scripts.

For instructions on setting up a virtual domain, click here.
Stats
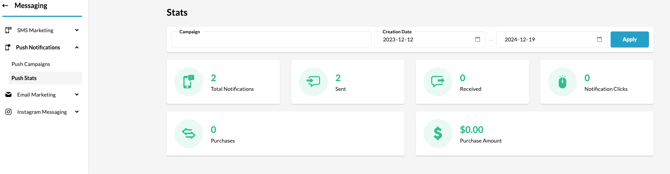
1. In your Push Notifications section, select "Push Stats" from the menu on the left
2. Begin filtering your stats by inputting a campaign or a date range
- Total Notifications: the total number of notifications that were initiated to fans
- Sent: the total number of notifications that were pushed to fans
- Received: the total number of successful deliveries to fans browsers
- Notification Clicks: the number of times notification campaigns were clicked
- Purchases: the number of purchases that resulted from notification campaigns
- Purchase Amount: sales amount that resulted from notification campaigns
Still need assistance? Please reach out to your Customer Success Team or contact support@tradablebits.com