FanXP is our interactive live streaming platform that helps transform relationships with fans. This guide was put together to equip you with the knowledge to put on an event your fans will never forget. This guide will address four main sections:
- User-Flow
- Definitions & Asset Guides
- Setting up a FanXP event
- FanXP Design Examples
- FanXP Plumbing and Checklist
1. User-Flow
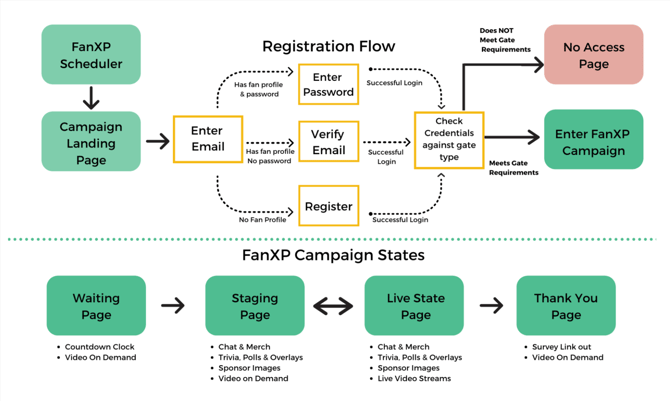
The login flow for users accessing your FanXP campaign is set up on the account level because it involves your FanCRM. See the flow chart below to understand where FanXP campaigns sit within your account:
The User-Flow for fans participating in a FanXP campaign looks slightly different than the Setup flow of the campaign within the Tradable Bits Platform. The picture below outlines the User-Flow for FanXP.
Definitions & Asset Guides
The following definitions will help visualize the user flow throughout your FanXP campaign.
We recommend sending the following materials over to your design team, so they can build out the necessary assets for your campaign:
FanXP design guideline - a simple, barebones document with image sizing.
Definitions
Campaign Landing Page
The landing page is where users must sign in to the event. It is the first page that they see when they click on the “access” link for the stream.
Registration Flow Pages
The registration pages are where users verify their ticket purchase with their login credentials. As you can see in the image above, the registration flow for users depends on whether they have an existing fan profile within Tradable Bits or not. Their fan profiles are then checked against the gated requirements you will set in your FanXP event.
No Access Page
Users get this page when they exist in your FanCRM, but do not have a ticket to enter (i.e. do not meet your gated requirements). Users that do not exist in your FanCRM will be presented with an error message instead of the no access screen.
FanXP Campaign States
FanXP has multiple states that the producer controls. Once the user has verified their ticket purchase with their login credentials, they are pushed into the FanXP Campaign. The first page they see will depend on what state the producer console has set.
Waiting Page
The waiting page is where users usually wait after they have verified their ticket and entered the campaign, but before the event is open. While fans are in the waiting page state, inform them about upcoming events or other interesting announcements using video on demand. This stage of the FanXP campaign is an opportune time to engage with some of your most qualified leads.
Staging Page
The staging page is what viewers see when they are pushed by the producer from the waiting page. The staging page is essentially the “no video state” version of the live state page. Staging Page includes the same user interactions as the live state, where users can interact with each other in the chat and view merchandise or other digital assets pushed by the producer. All content pushed by the producer in this stage will show up in the middle of the screen (the content portion of the page).
To view the overlay guide, click here
Live State Page
This page is what viewers see when the video feeds are pushed live. There are 3 main components: the live stream feed taking up most of the page, the navigation bar to the right, and the toolbar to the top. All content pushed by the producer in this stage will show up in the navigation bar, including polls, chat, merchandise and more.
To view the Overlay Guide, click here
Thank You Page
The Thank You Page is where users land after the event is over.
2. Setting up a FanXP Event
Now that you understand the general user flow through a FanXP campaign, you are ready to set up your FanXP event! In this part of the guide, we will explain each section in the campaign setup.
Location
The first thing you need to do is click into your business account under the “Campaigns” Section. Then click on “New Campaign” → FanXP.
Setup
General Setup
This section is where you set your campaign’s name and start/end time. Enable “countdown timer” if you want a timer to be displayed on your waiting page state. The “Legal Setup” is populated by the terms and conditions you have set account-wide.
FanXP Configuration
The user-facing view of FanXP consists of 3 main areas:
1. The toolbar
2. The content area to push video feeds
3. The navigation sidebar where user interactions take place.
Within the FanXP Configuration tab, you will set up:
- Entry Gate Requirements
- Email Reminders
- The Waiting Page
- The No Access Page
Entry Gate
FanXP allows you to create conditions for entry (i.e. it can provide gated access). You can limit users based on their CRM tag or based on ticket purchase. To set up your ticketing integration, please contact your support specialist.
Purchase Ticket URL: Input your purchase ticket URL here.
Email Reminder Setup
This section allows you to set up automatic email notifications for all registered users before the campaign begins. Registered users are identified by the Ticket/ Tag gate options you set above, or those who accessed the campaign before the start of the event. Enable to send out email reminder notifications, and make sure to set your “reply to” email.
Waiting Page
In this section, set the header image/video and description for your waiting page.
No Access Screen
In this section, set the header image and description for your no access page. Make sure to add in your purchase ticket URL somewhere on the page (either as the image URL or in your description) so that users who want to access the stream know how to do so.
FanXP Sidebar
This is where all user interactions take place
Side Bar Elements
Leaderboard: The Leaderboard is where fan points are shown. Fan points are based on interaction with trivia, clickers, and games throughout the live stream. There are 3 options for the leaderboard:
- Leaderboard with questions, clickers and fan points from custom-tab game configuration: this is our default option
- Leaderboard with questions only: this is a great use-case if you're trying to give prizes based on trivia points
- No leaderboard: If you don't see a use for the leaderboard, this is the option you should choose.
Shopify Integration: If you would like to integrate your Shopify plus account with your live stream, reach out to your support specialist and they will assist with the setup.
Notification Sound: Enable to play a sound when an overlay is pushed
Automatically Expand Overlays: The default state for overlay notifications requires the fan to click on it for the overlay to expand. Toggle this on to have overlays automatically expand.
Page Toolbar Logo: A toolbar appears at the top of the FanXP campaign once the event enters the waiting, staging, live state, or thank you page. This toolbar consists of a logo on the left side and profile settings on the right side. Insert your logo image here.
Arena Sponsor: Your arena sponsor will appear at the bottom of the sidebar, and in a pop-up modal for fans to click on if they disconnect & reconnect to the live stream during its staging or live state.
- The arena sponsor Logo scales to 16px tall.
- Make sure the image has a transparent background
Chat Tab
The Chat tab is where users can interact and build a community with each other.
Enable Chat: To enable the chat tab, toggle "Enable Chat" on.
Default Tab: Toggle on to make the chat tab the first tab that users land on when they enter the campaign. If left off, the default settings will send users to the "home tab" upon login.
Fan Rooms: Fan rooms are spaces for fans to chat outside of the main global chat room. If toggled on, fans will be able to create their own chat rooms during the live stream. Fans can create rooms around themes or community - for eg. "Australian Drake Fans" or "Yeezus4life"
Permanent Chat Rooms :
-
Global Chat Room: This room is created by default, and is where all users land when they initially enter the chat tab. The name of this room can be changed in the "Localize Language" section of FanXP
-
Additional Chat Rooms: Your team can create additional chat rooms that will be available for fans to choose from in the upper right corner of the chat tab.
- These rooms can be gated based on CRM tag. If gated based on the CRM tag, the room will only appear as an option for fans with the corresponding CRM tag.
- Best Practices:
- Create a Support Room for fans to click on if they run into problems.
- If running an event with multiple stages or artists, create rooms corresponding to each stage/ artist. I.E "Stage 1 - Hip-hop"
- Gated rooms are a great way to treat VIP members - invite them to join the VIP room and give them a more curated experience. For example, the chance to talk to artists/ players during the event.
Stats Setup
A stats tab can be set up for your team if you are part of the: NBA, MLS, or NHL. To set up your stats tab, you will need the 3 letter code for the home team and the 3 letter code for the away team.
Home Tab Content
The home tab is part of your navigation bar and is the default tab where fans land upon login. There are also tabs to display video feeds, chats, leaderboards, and more.
In live-state, the Home tab is where all pinned items will appear. It is also where clickers, trivia, banners, and static overlays are pushed.
In this section, set the header image and description for your home tab. You can also leave this section blank if you don't want a header image or description.
Custom Tab HTML Support
If you want to create a custom tab for your navigation bar, this is where you can do so. The custom tab is a great place to set up your 8-bit games or other types of interactions. Speak to your partner specialist to see what might be possible.
Landing Page
This is where you set your header image and description for your landing page.
Thank You Page
This is where you set your header image and description for your thank you page. If you include a header image URL, you can add a tracker link by toggling "Generate tracker"
Footer Settings
If you would like to share your FanXP campaign across channels, this is where you control the image and messaging that people can see. Set your share image, title, and description, as well as select products that will appear in a grid layout above the social media links on your campaign page.
Theme Customization
The theme customization page is where you can beautify your landing page, waiting page, and thank you page. Here you can choose a background image or color that will show behind your headers and text descriptions, font color, and button colors. The design choices you choose within theme customization will be global across the landing page, waiting page, and thank you page.
Custom CSS/Javascript
This section is where you can deviate from our pre-set themes using CSS/JS to customize your landing page, waiting page, and thank you page themes the way that you want.
Access Restrictions
In this section, you can set entry restrictions based on region and age.
Miscellaneous
In this section, you can request the ability to send notifications, add on your Google/Facebook tokens/pixels, customize your namespace, and tag fans for your CRM.
Localize Language
FanXP supports Dutch, French, German, Japanese, Russian, Portuguese and Spanish in addition to English. Set your language here.
Entries
The entries section is where the producer can prepare interactions for users during the event, and where the video feeds are set up. For a more in-depth look at how to use the producer console, click here
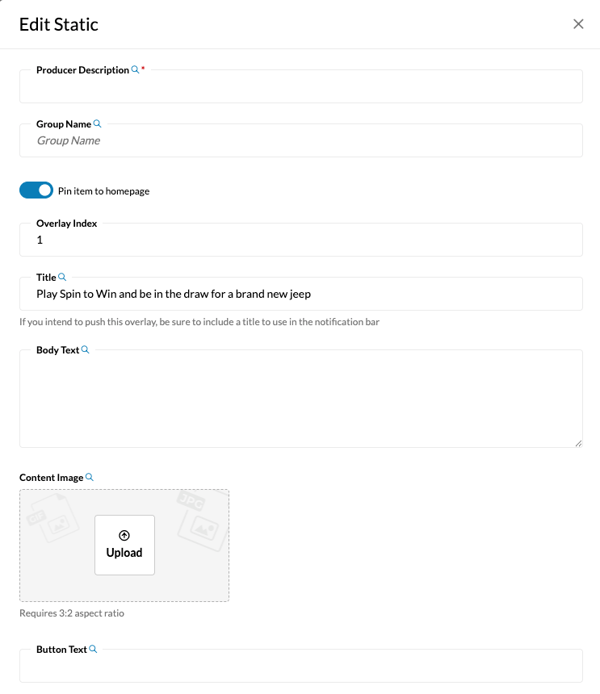
Overlays
FanXP supports several different overlay types, including questions, static overlays, banners, a clicker, and custom fields. You can use these overlays to push merchandise, ads, ask trivia questions, and more. To set up an overlay type, click "Add New" and choose a type. The requirements for each overlay type are laid out as soon as you click on them. Name your overlay something intuitive for the producer. You can also group overlays under common themes, such as 'sponsor' or 'trivia,' with "group name".
Note: We recommend pushing an FAQ overlay at the beginning of every FanXP event so that your fans feel supported. Use the static overlay option to link fans to your FAQ.
Pro-Tips:
-
Create an FAQ static overlay to push at the beginning of every FanXP event, so that your fans feel supported.
-
Static Overlay types are a great tool to push advertisements.
Trivia is a fantastic way to engage your audience, but make sure your producer is strategic about when they push the questions.
Feed Setup
This is where you set up the video feeds that are going to be streaming into your FanXP campaign. Scroll down to the FanXP checklist section to see some technical requirements. To make sure your feeds are set up correctly, please contact your Tradable Bits support.
Feed Image Assets
In this section, set the images that will be displayed in the content area of FanXP when there is no live video feed, or when the user is switching video feeds.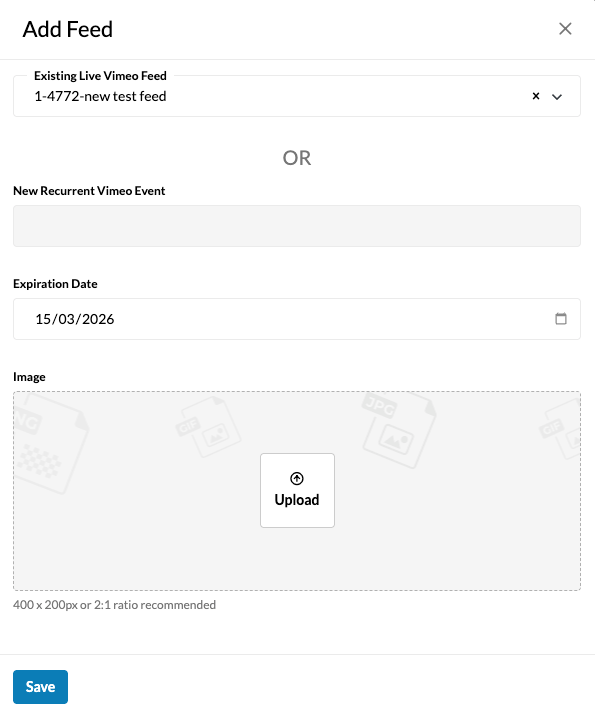
Video Feeds
When you click on add feed you will be prompted with a modal to set up a Vimeo Feed or an HLS feed.
You can also gate your video feeds here based on the fan's CRM tag. For example, if you want VIP members to have a 'behind the scenes' live view, then you can gate your feed so it is only visible to fans meeting your VIP CRM tag requirements.
-
Note: to set up a Vimeo Feed, you need to connect your Vimeo account with your Tradable Bits account. Contact your support specialist to set this up.

Video on Demand
In this section, you can provide video content for fans to enjoy while they're in the waiting room, staging room, or after the event on the thank you page. Simply upload your video, title it, and then select which pages it should appear in. Use the waiting room and staging room to promote new content, announce big events, or drop merchandise - after all you have the focused attention of high-quality leads.
3. FanXP Design Examples
In this section, we will show the fan-view of FanXP in its different stages.
Registration Page
FanXP Plumbing and Checklist
Technical Requirements
Video Feed
- You need a live broadcast account with Tradable Bits/Vimeo
- Ensure that you have at least 10 Mbps of dedicated upload speed per feed for broadcasting
- Pre-recorded content that needs to go Live has to be shared with Tradable Bits at least 3 business days before the event. The video file should be 1080p and h264.MP4 format.
- Re-encode the pre-recorded content and convert it to RTMP. Tradable Bits can facilitate this.
- Your Production Team will need to send their produced program via RTMP using an encoder. The RTMP URL and Stream Key will be provided before the event. Every event will have a unique Stream Key.
- Ensure that you have the necessary audio, video and lighting equipment to record content either live or beforehand. Cameras will need to have the necessary encoders to support transmission to the Internet for direct live streaming.
People and Process Requirements
Process
- Onboard a Show Producer, camera operators, AD/Floor Director, and other personnel as needed to produce the video content and please share contact details with the Tradable Bits team.
- Ensure that Ticketing, TBits and FanXP Campaign are all set up correctly.
- Create necessary design, creative and copy for FanXP landing pages and sponsor overlays.
People
- Ensure that an Online Support system is functional. An online Chat service will be set up for support. Assign an agent to answer questions and set up any templates needed in advance.
Now that you've finished all of the above, you'll be ready to put on your interactive live stream event!
Still in need of assistance? Reach out to your Partner Specialist, or Contact our Support Team.