Here's a quick guide on how and when to set up an Altered Reality campaign.
The following guide will walk you through how to set up your first “Altered Reality” Campaign
In this article:
- What is Altered Reality
- When should you use Altered Reality
- How to configure an Altered Reality Campaign
What is Altered Reality?
Altered Reality is a low-lift AR Photo Filter builder for web-based AR experiences.
It’s a tool for you to use when you don’t want to jump into Meta Spark Studio and is a fun way to incorporate brand images, sponsor tie-ins, etc into a downloadable image for your fans.
Altered Reality Features

-
Facial Detection Customization: You can set your filters to be more accurate or more responsive by experimenting with Facial Detection Thresholds
-
Customizable AR Images: Altered reality currently supports AR filters to apply against the fan’s face. In beta, you can set a filter image for the eyes, nose, mouth and jaw - and then customize as you see fit
-
Downloadable Images: Once your fan takes a photo, they can download the image directly to their device
When should you use Altered Reality?
Experiment with a new type of UGC and engagement with Altered Reality. This is the perfect campaign to use when you want fans to interact with an AR filter while collecting data.
Some examples of how to use the Altered Reality campaign include:
- Co-promotion with a commercial sponsor, creating a branded AR filter for fans to interact with in exchange for prizing.
- Connect the Altered Reality Campaign to a UGC campaign to showcase all AR images across your big screens or on your website.
- Experiment with the Altered Reality Campaign as an additional asset to a live activation, having fans scan to take a photo at a booth as part of their submission.
How to Configure an Altered Reality Campaign?
Altered Reality follows the same format as all Tradable Bits campaigns with a “Setup” section and a “Design” section. Follow the sidebar from top to bottom, and view the design guidelines for additional information on image sizing recommendations.
Altered Reality Configuration
Once you have completed “general setup” click on the Configuration tab.
You have three main components you can set up:
- Facial Detection
- Screenshots
- AR Images
Facial Detection
This section allows you to customize how responsive or accurate you want your AR images to be against each fan’s face. The two main functions to set up are:

-
Score Threshold: This determines how precise facial detection will be. To use this function, you can set a “threshold” between 0 and 1. The trade-off you will make with this function is accuracy versus consistency.
- Accuracy: The higher you set the score threshold, the more precise your AR filter will be (i.e. a score threshold of 1 is the highest accuracy). However, the need for precision means that the AR filter may flicker depending on the angle of the fans’ faces as they play around with the filter, or it may not appear at all. We recommend setting the score threshold below 1.
- Consistency: The lower you set the score threshold, the more consistent the effect (i.e. a score threshold of 0 means that your AR filter will almost always show up), however, the effect may appear glitchy or attach to the wrong things with a lower score threshold.
-
Draw Interval (ms): This section determines how often the filter is “drawn” in milliseconds - in other words, the “buffer period”. The higher you set this draw interval (i.e. 10 draws per ms) the better the buffer, however, the trade-off is choppier face-tracking (i.e. the filter being ‘redrawn’). Likewise, a lower draw interval means better face tracking, but lower performance.
-
As an additional function for testing your filter, you can toggle on Facial Detection Landmarks so that you can see what the AR filter is mapping to.
PLEASE NOTE: Make sure you toggle this off before you go live on your campaign

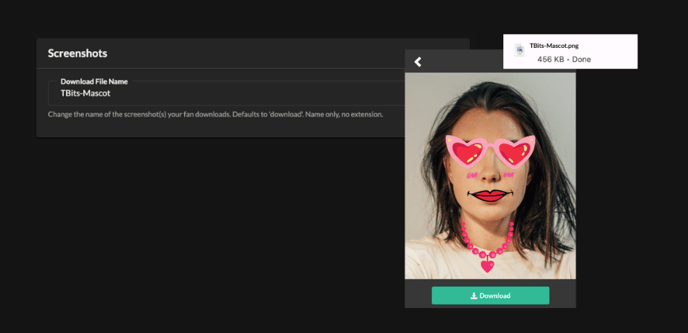
Screenshots
This section is where you can rename the file name of the photos that your fans will download from the campaign. Have fun with this name! For example, “Tradable Bits Kraken Mascot Photo,” or any other descriptor that helps your fan remember what the photo they took was for. As a default, the file name is set to “download.”
AR Images
This is the bread and butter of the campaign, and where you can set up your AR filters. In this Beta Version, you can set up 4 different filters that all apply to the fan’s face as shown below:
Here are some tips to get the AR filter right:
- The images you upload should be as cropped as possible on upload (no padding) for the best possible effect.
- You can play around with placement using the X and Y offset. If you want to create a “headband” filter effect for example, you can use one of the other filter placements and simply “offset” the filter until it lands where you’d like on your face.
- To make images bigger or smaller, use the Padding field. The number you input corresponds to the number of pixels that would be added or subtracted from the original image. For example, an input of 5 in padding would mean an increase of 5px to the width of the image (with a corresponding adjustment to the height, depending on your image’s aspect ratio).

Other adjustments you can make:
- Filter Opacity: Control how transparent you want your image to be. You must enter a value between 0-1. A value of 0.5 would correspond to 50% opacity.
- Filter Draw Order: This determines the order in which the individual filters are drawn (or which images buffer first). The filter with the highest draw order will buffer first.
- Jaw Filter Rotation Threshold: You can use this threshold to hide the jaw filter when a fan rotates their face too much.
Testing
To test the AR filter to see how it’s working against a human face, you can click on the “eyeball” icon n the top left corner of the campaign. This will let you walk through the campaign like a fan. We recommend testing on both desktop and mobile before you go live with your campaign.
In the case that you don’t want any test entry counting toward your final result, put your CONVERT YOUR CAMPAIGN TO DRAFT mode. This mode will automatically wipe any entries after 24 hours. If you opt to do this while you test, make sure you convert the campaign back to “Approved” before you go launch the live version of the campaign.
Fan-View of Altered Reality
Altered Reality will ask the fan for access to their camera. This is generally how the campaign flow works for fans:

That’s it! Have fun creating your first Altered Reality campaign! As this is still the Beta version, we’re happy to hear your feedback.
Still need assistance? Please reach out to your Customer Success Team or contact support@tradablebits.com