Here's a quick guide on how and when to set up a Ticket Registration Campaign.
How to set up your first Ticket Registration Campaign
The following guide will walk you through how to set up your first “Ticket Registration” Campaign
Please note: To use this campaign you will need:
- A ticketing integration (or a CSV with all purchasers to your desired event).
- An event set up within Tradable Bits.
In this article
- What is the Ticket Registration campaign
- When should you use the Ticket Registration campaign
- How to Configure a Ticket Registration Campaign
What is the Ticket Registration Campaign?
Fans attend events with their friends. Whether it’s a festival, a concert or something else live and experiential, chances are that you have a large portion of fans who purchase tickets for themselves and 1 or more friends at once.
Uncovering who these 1 or more other friends are is a big opportunity:
- To remove these hidden fans from your paid targeting (after all, they’re already ticket-buyers even if they haven’t been captured by your ticketing information), and
- To make sure they’re captured for future targeting and segmentation.
The Ticket Registration campaign is an easier way to gamify ticket registration with some sort of sweepstakes or giveaway so that you identify individuals who got their friends to purchase tickets for them. It comes with built-in transactional email features so that you can target all fans who have not registered their tickets.
Ticket Registration Features
Tradable Bits Auth
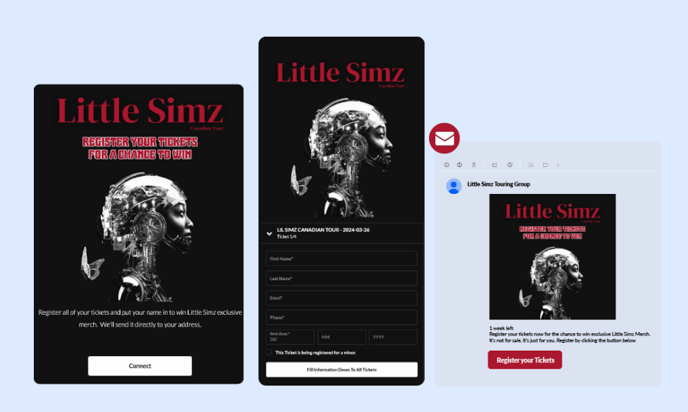
Instead of an entry form, this ticket registration campaign uses Tradable Bits Auth (a log-in mechanism) so that we can confirm which fans have registered their tickets and which fans have not.
Transactional Email
Email all fans that have purchased tickets to your chosen event directly, to increase the chances they register their tickets.
Reminder Email
As a follow-up, email all fans who have not registered their tickets.
When should you use the Ticket Registration Campaign?
When you want fans to register their ticket for a specific event.
How to Configure a Ticket Registration Campaign:
Ticket Registration follows the same format as all Tradable Bits campaigns with a “Setup” section and a “Design” section. Follow the sidebar from top to bottom, and view the design guidelines for additional information on image sizing recommendations.
Before you start configuring your Ticket Registration Campaign, make sure that you have a Ticket Event set up. If you have a Ticketing Integration set up with Tradable Bits, you can choose from a drop-down of all your existing ticket events.
If you do not have a ticketing integration but have a CSV of ticket purchasers to an event you want to target, then you can manually create an event. Note that this method means you are targeting a static list of purchasers. To learn how to configure this campaign without a ticketing integration, scroll to the bottom of the guide.
Ticket Registration Configuration
Once you have completed “general setup” click on the Configuration tab.
Here you have two components to can set up:
- Ticket Event(s)
- Volume Handling (optional)

Ticket Events
This is where you can choose which ticketing events you want to target with this campaign. Your choice of event will gate the campaign so that ONLY PURCHASERS to your selected event(s) can enter your campaign to register their tickets.
Choose one or more ticket events by clicking on the Ticket Events field. The drop-down will show you all available ticket events to choose from.

Messaging
Next, head to the Messaging tab.
Here's how you'll get in touch with your fans that entered.
- Registration Email Configuration
- Reminder Email Configuration
Registration Email Configuration
Use this section to create a transactional email that will go out to all ticket purchasers of your selected event. This email is where you can customize messaging to encourage your fans to register their tickets (whether you need fans to register to receive their lanyards, or if you are running a giveaway to identify ‘hidden’ purchasers).
This email is not always on. To send your configured email, click the Push button.
Reminder Email Configuration
Use this section to create a reminder email to follow up your original email. This reminder email will be sent to all ticket purchasers of your selected event who have not registered their tickets through this campaign. You can push this reminder email multiple times.

Setting up your Ticket Registration Campaign without a Ticketing Integration
While we recommend you use this ticket registration campaign with a ticketing integration, it is possible to launch one without. The biggest caveat here is that your ticket registration campaign will only target a static list of uploaded purchasers. To configure this campaign without a ticketing integration, complete the following steps before configuring your campaign:
Set up a new event in Tradable Bits
- Go to the homepage of Tradable Bits and scroll down to the Sales section underneath the “Know your Fans” pillar
- Click into Sales > Cleanup > Events
- Click +New Event
- Fill out the Event Details Modal with all relevant information. Note down all of these details for your manual import of “ticket-buyers” which is the next step
- Save your event
Manually import purchasers to this event
- In the Sales Section go to Import > Sales
- Click the Import CSV option at the bottom of the page and follow the Sales Import Instruction list, ensuring to include the following columns: Email, Paid Amount, Event Date, Purchase Date, and Event Key

You can now configure your ticket registration campaign.
Other Configurations
Ticket Registration uses the Tradable Bits Auth as the login mechanism for fans. This allows us to confirm which fans have registered their tickets and which fans haven’t. The Tradable Bits Auth is tied to your business not to the campaign, so to customize how it looks, follow these steps.
- Click out of your campaign back to your Business Dashboard.
- On the left-hand menu go to Business Settings > Default Settings and scroll down until you see Auth Service
- Here you can customize a header image, the background image and the button colour of the Auth’s log-in flow

To customize the verification email that accompanies the Tradable Bits Auth for identity validation, follow these steps:
- Click Authentication Service> Configuration underneath your Business Dashboard
- Scroll down until you see the Verification Code Email Configuration
- Customize this email by filling out all available fields
That’s it! Have fun creating your first Ticket Registration campaign! Reach out to your Customer Success Manager or contact support@tradablebits.com for any unanswered questions.