Are you putting a campaign QR code on the big screen to spur-in venue participation? Or are you printing out QR codes on signage across town to drive traffic to your ticketing page? Whatever way you share your QR codes, you now have the option to customize how they look so they’re better affiliated with your brand!
We will walk you through 2 scenarios to create branded QR codes:
- How to create a custom QR code for any URL
- How to create a custom QR code for one of your Tradable Bits engagement campaigns
How to create a custom QR code from scratch for any URL.
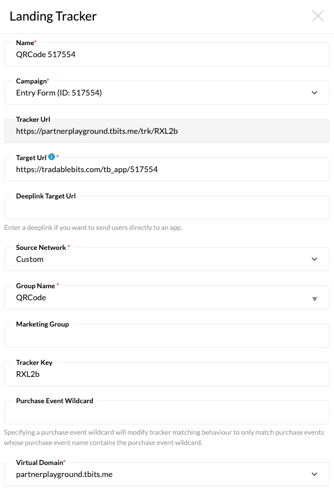
1. To begin, start in the Trackers > Landing Trackers section of the platform under “Know your Fans”


5. Click Save to apply your changes
6. To download your new QR code, click the Download QR-Code button and select the file type you would like

You can also quickly download it as a PNG at anytime by hitting the QR icon on the far right of the landing trackers page.

How to create a custom QR code for one of your campaigns:
Our system automatically generates a QR code tracker for every campaign you create. While you can download the QR code in the publish section of your campaign, we created a QR code tracker to help control the QR experience.
For example: using the tracker link for your QR code, you can easily switch out the target URL if there are last-minute changes to the campaign you want to show - meaning you don’t have to fuss about which QR code you’ve printed. And, you can see how many folks have clicked on your QR code tracker depending on where you’ve displayed it.
To begin, start in the campaigns section of the platform
- Scroll down to the campaign you would like to share by QR code and copy its campaign ID

2. Click out of the Campaign section and go to Trackers > Landing Trackers under the “Know your Fans” section of the platform.

Be sure to adjust the Creation Date range here to match that of the campaign that you are generating a QR code for. A QR code will not be generated for a campaign that has closed.

4. Click on the pencil icon to begin editing
5. Make any necessary changes to the tracker, including Name, Network, Group Name, Marketing Name etc - all of which are meant to help with organizing and reporting on after-the-fact.
6. Scroll down to the fields that are labelled QR Code Background Color, QR Code Dots Color and Center Image. These are the fields that allow you to customize the look of your QR Code. Choose your desired colors and center image!
Pro Tip: If you are adding a center image to your QR code, we recommend the following:
1.Use a square image. For example, an icon that fits 1000px by 1000px
2. Make the background of your center image match the background of your QR code. This will help it pop.
7. Click Save.
8. To view your custom-branded QR Code click on the QR code icon beside the tracker short link. This will download your QR code as a png to view.
Still need assistance? Please reach out to your Customer Success Team or contact support@tradablebits.com