---
title: How do I add Tracking Tags to my campaign?
description: Tracking tags or pixels provide critical insights into your campaign performance by monitoring specific user actions, such as page views and registrations. Integrate these tools into your Tradable Bits engagement campaigns so you can connect conversions to known fan profiles and monitor the effectiveness of your marketing efforts across networks.
---
[Skip to content](https://resources.tradablebits.com/support/how-do-i-add-tracking-tags-to-my-campaign#main-content)
English
Show submenu for translations
![tradable-bits-long-logo-for-download.png\]](https://resources.tradablebits.com/hs-fs/hubfs/tradable-bits-long-logo-for-download.png?height=40&name=tradable-bits-long-logo-for-download.png)
Open main navigation
Close main navigation
- English
Show submenu for translations
How can we help?
- There are no suggestions because the search field is empty.
1. [Resources](https://resources.tradablebits.com/support?hsLang=en)
2. [Ads](https://resources.tradablebits.com/support/ads?hsLang=en)
# How do I add Tracking Tags to my campaign?
## Learn how to connect your tags and pixels to engagement campaigns so you can track and retarget fans based on their behaviours
Tracking tags or pixels provide critical insights into your campaign performance by monitoring specific user actions, such as page views and registrations. Integrate these tools into your Tradable Bits engagement campaigns so you can connect conversions to known fan profiles and monitor the effectiveness of your marketing efforts across networks.
In this guide, we’ll walk you through adding your tags and pixels, whether you're setting them at a business-level or customizing them for individual engagement campaigns.
### Getting started
To start, you'll need to create or set up your tracking tags/pixels in the relevant platform ([Meta](https://www.facebook.com/business/help/952192354843755?id=1205376682832142), [TikTok](https://ads.tiktok.com/help/article/get-started-pixel), [Google Tag Manager](https://support.google.com/tagmanager/answer/15756616?sjid=17050058184341063319-NC), or [Google Ads](https://support.google.com/google-ads/answer/15756614?hl=en)). Once you have your tags, it's time to link them up in Tradable Bits!
Depending on what you plan to track, it may make sense to configure your tags and pixels at the Business level. This means the *same* tags/pixels would be applied to every campaign under that Business.
Alternatively, if you want to use a unique set of pixels or tags for a particular marketing initiative or event, it's best to set them at the individual engagement campaign level.
### Adding Tags/Pixels at the Business Level
To set your tracker tags at the business level within your account, from the top menu bar, choose **Campaigns**, then select the Business you're working from. One that is selected, click **Business Settings** \> **Default Settings**.
Scroll down to **Tracking Tags,** click +Add Tag next to the relevant platform, and paste in your tracker/pixel tag ID.
Click **Save**.
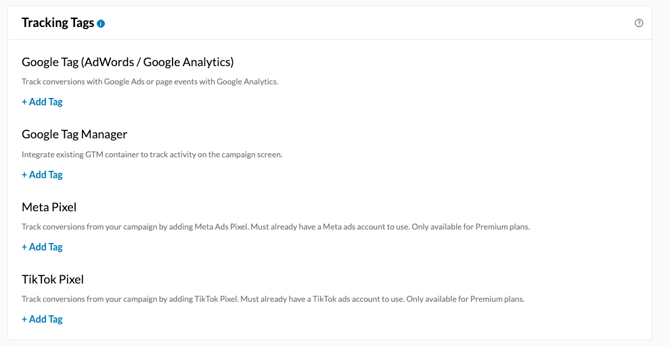
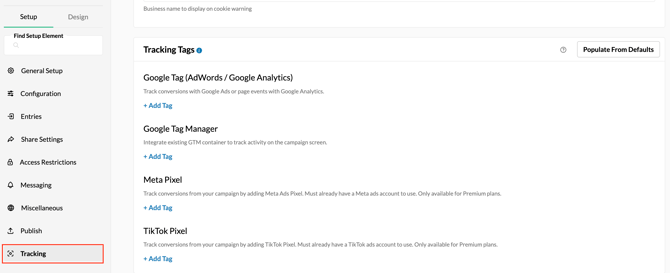
Once this is done, your tags will be automatically applied to new campaigns you create from this Business. You can also apply the tags to existing campaigns. To do this, open the campaign in question and navigate to **Setup** in the left menu. Scroll down to **Tracking.**
From here, click the **'Populate From Defaults'** option in the top right corner. This will apply the tags you configured at the Business level.
****
### Adding Tags/Pixels at the Campaign Level
If you'd like to add your tracking tags/pixels to one specific campaign, you can do so from the campaign settings.
To start, open the campaign and make sure you're in the **Setup** section in the left menu. Scroll down to the bottom of the menu and click **Tracking**.
From here, just click +Add Tag beside the tag type of your choice, and add your tracking tag/pixel ID. Finally, click **Save**.
**Note:** Configuring tracking tags on embedded campaigns requires additional setup in the corresponding Publish section of the campaign.
If you would like to add tracking tags/pixels to a campaign you have embedded in your website, each campaign has some embed code you can use to set this up. To find this, from the **Setup** section of the campaign, open the left menu and scroll down to **Publish**.
From here, navigate to the **Embed On Website** section, and you'll find the following:
#### *When using the embed code, additional helper functions are exposed to make the setup of marketing cookies on the parent website easier. These are not available for embeds using iframes directly. The available functions and how they should be called are shown below.*
` `
When you copy this embed code over, be sure to add your specific tracking tags/pixel IDs between the bracket sections.
That's it! Your tracking tags have now been configured, and you're collecting powerful data.
**Still need assistance? Please reach out to your Customer Success Team or contact** [**support@tradablebits.com**](mailto:support@tradablebits.com)
- [Getting started](https://resources.tradablebits.com/support/getting-started?hsLang=en)
- [Account](https://resources.tradablebits.com/support/account?hsLang=en#main-content)
- [Security](https://resources.tradablebits.com/support/account?hsLang=en#security)
- [Integrations](https://resources.tradablebits.com/support/integrations?hsLang=en#main-content)
- [Outgoing Integrations](https://resources.tradablebits.com/support/integrations?hsLang=en#outgoing-integrations)
- [Incoming Integrations](https://resources.tradablebits.com/support/integrations?hsLang=en#incoming-integrations)
- [Salesforce Marketing Cloud](https://resources.tradablebits.com/support/integrations?hsLang=en#salesforce-marketing-cloud)
- [FAQs](https://resources.tradablebits.com/support/faqs?hsLang=en)
- [Troubleshooting](https://resources.tradablebits.com/support/troubleshooting?hsLang=en#main-content)
- [CSS/JS](https://resources.tradablebits.com/support/troubleshooting?hsLang=en#css-js)
- [Reports](https://resources.tradablebits.com/support/reports?hsLang=en)
- [Engagement Campaigns](https://resources.tradablebits.com/support/engagement-campaigns?hsLang=en#main-content)
- [Campaign Basics](https://resources.tradablebits.com/support/engagement-campaigns?hsLang=en#campaign-basics)
- [Campaign Management](https://resources.tradablebits.com/support/engagement-campaigns?hsLang=en#campaign-management)
- [Creating Campaigns](https://resources.tradablebits.com/support/engagement-campaigns?hsLang=en#creating-campaigns)
- [Best Practices and Troubleshooting](https://resources.tradablebits.com/support/engagement-campaigns?hsLang=en#best-practices-and-troubleshooting)
- [UGC](https://resources.tradablebits.com/support/ugc?hsLang=en)
- [Fan CRM](https://resources.tradablebits.com/support/fan-crm?hsLang=en)
- [Sales](https://resources.tradablebits.com/support/sales?hsLang=en)
- [Idols](https://resources.tradablebits.com/support/idols?hsLang=en)
- [Trackers](https://resources.tradablebits.com/support/trackers?hsLang=en)
- [Messaging](https://resources.tradablebits.com/support/messaging?hsLang=en#main-content)
- [SMS](https://resources.tradablebits.com/support/messaging?hsLang=en#sms)
- [Email](https://resources.tradablebits.com/support/messaging?hsLang=en#email)
- [Push Notifications](https://resources.tradablebits.com/support/messaging?hsLang=en#push-notifications)
- [Instagram](https://resources.tradablebits.com/support/messaging?hsLang=en#instagram)
- [Ads](https://resources.tradablebits.com/support/ads?hsLang=en)
- [Octane](https://resources.tradablebits.com/support/octane?hsLang=en)
- [Product Updates](https://resources.tradablebits.com/support/product-updates?hsLang=en)
[](https://tradablebits.com/)
Copyright © 2026, Tradable Bits