![tradable-bits-long-logo-for-download.png]](https://resources.tradablebits.com/hs-fs/hubfs/tradable-bits-long-logo-for-download.png?height=40&name=tradable-bits-long-logo-for-download.png)
Performances act as central containers that group all campaigns, ads, and tracking assets for a specific event under a single name. Individual events (like a single show) can be aggregated into Performance Groups (like a full tour) to streamline campaign management. This setup allows you to automatically track conversions and easily analyze results at both the single-event and full-tour level.
Step 1: Create a Performance
- From the Tradable Bits Homepage, hover over the Sales section of the Top Navigation Bar and click on Performances.
- Click + New Performance
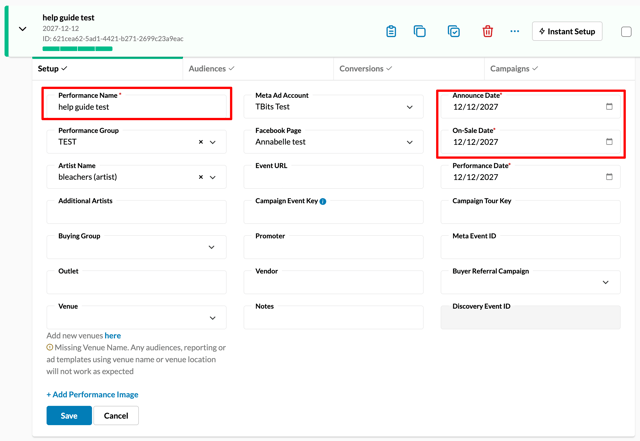
- Fill out the following fields:
-
- Performance Name: A unique label used to identify this specific Performance/event container.
- Performance Group Name: An overarching identifier used to aggregate multiple related Performances (e.g., a multi-city tour or multi-phase campaign).
- Meta Ad Account: The Meta (Facebook/Instagram) Ad Account used to run campaigns for this Performance.
- Facebook Page: The official Facebook Page running the ads.
- Artist Name: The name of the artist, band, or idol associated with the campaign.
- Announce Date: The scheduled public announcement date for the event or initiative.
- On-Sale Date: The date and time tickets or offers officially open to the public.
- Performance Date: The scheduled date of the live event or campaign.
- Event URL: The primary destination link designed to convert fans (e.g., ticket page or portal link).
- Venue: The physical or virtual location of the event (must correspond to an existing venue in your system).
- Meta Event ID: The unique identifier assigned by Meta to sync event tracking and custom conversion data.
- Promoter: The specific promoter, agency, or organizing partner entity tied to the event for tracking and dataset mapping.
- Event Key: The primary unique identifier (ID string) used to map this event to its corresponding sales data in your Offline Conversion Dataset.
- Buying Group: Indicates whether media purchasing is managed at a National (centralized) or Local (regional/province) strategy level.
- Notes: Internal comments or documentation regarding the setup or automation rules for future reference.
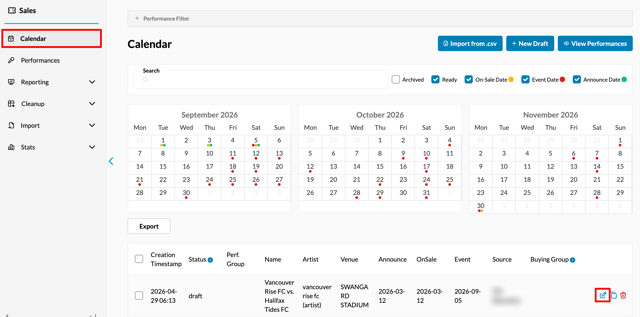
Managing Status: You can update a performance's status (e.g., from Draft to Ready) at any time by navigating to Sales > Calendar, clicking the pencil icon next to your performance, and selecting your new status.
Step 2: Configure Audiences
Once you've added a Meta Ad Account under Setup, you can configure your Audiences.- The following options are available. You can select just one of these options, or use a combination of them, as desired:
- Previously Used Audience: These reflect custom audiences that you have already built in FanCRM. Click the + (add) icon next to any audience to add it to your targeting.
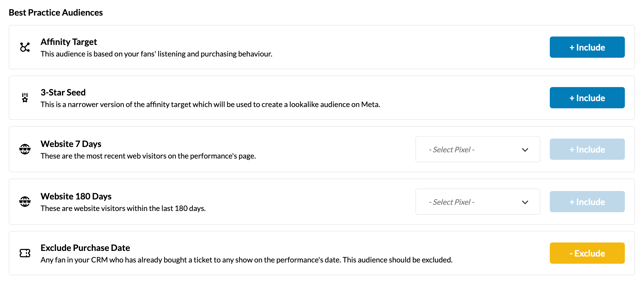
- Best Practice Audience (Recommended): These are pre-built audiences generated by our system to target the ideal fans for a specific performance. We highly recommend hitting Include or Exclude against each of the options listed here to optimize your reach.
- Advanced Audiences: If you'd like to create a highly specific, custom audience on the fly based on parameters from FanCRM, this tool allows you to build one from scratch.
Step 3: Map Conversions
- Click + Offsite Conversions.
- Choose to create a new conversion or utilise an existing one.
-
If creating a New Conversion, fill in the following:
- Name: A unique label used to identify this specific Conversion.
- Description: Pre-filled from Discovery Idol ID, but can be overwritten.
- Pixel ID: Select from your pre-configured sales pixels.
- Trigger Event: Select from our standard or pixel trigger events.
- Expiration Date: Set the active period for tracking.
- Key / Key Value: Set additional tracking parameters and select corresponding operators/values (click Add Additional Key for multiple keys).
Step 4: Setup Campaigns & Ad Sets
- Click + New Campaign to open the setup dashboard.
- Fill in the following fields:
- Reference Name: A name for the campaign that would help you identify the campaign once it has been configured.
- Label: If you want to label your campaigns. This is primarily used for reporting purposes. Use commas, spaces or click Enter to add multiple labels.
- Objective: The intended goal of the campaign, which allows us to optimise the delivery of ads.
- Meta Pixel: Add your associated Meta Pixel.
- Phase: Determines the stage that this campaign belongs to. It helps understand the performance of your advertising strategy after your event is done.
- Budget: Set the spend limit and toggle Generate Budget Line to display budget visibility.
Note: If your budget needs to include platform service fees, check the Inc. Fee box next to the column header.
3. Ad Set Details: Click Next to configure Ad Set parameters.
-
- Start Time & End Time: The active schedule of the Ad Set.
- Optimization Goal: This list is populated based on the Goal set at the campaign level and helps us understand the user action you are looking to optimize.
- Placements: Choose the type of ads that you run under this Ad Set. We recommend choosing Automatic for this unless you have a restriction on your assets.
- Languages: Targets fans that have the language chosen as their primary language.
- Age Range: The age of the fans you would like to target.
Note: Meta will not target fans under the age of 18, even when included in a custom audience.
4. Targeting & Location Mapping
-
- Add the locations you'd like to include/exclude in your audience targeting.
- Add a radius (default is 80km).
- Click the ⊕ icon to exclude the location.
Step 5: Bulk Ads Setup
- Under Automated Ads Flow, select your Ad Templates.
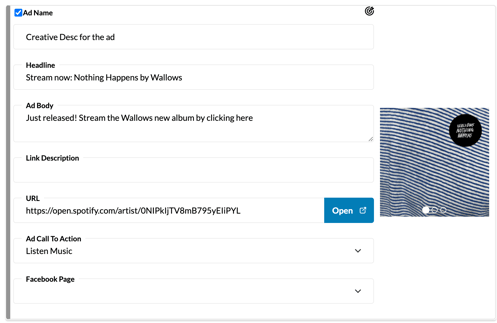
- Navigate to the Combinations tab to set individual ad details:
- Ad Name: A unique label for each specific ad variation, used internally to help you track and identify performance in your reporting.
- Headline: Add a primary title to be displayed as part of the Ad.
- Ad Body: The main text or caption of the ad.
- Link Descriptions: A description associated with the link to be displayed as part of the Ad.
- URL: The specific web page address where users will be sent after clicking on your ad.
- Ad Call to Action: The button or text prompt (e.g., Shop Now, Learn More, Sign Up) that tells users what action to take next.
- Facebook Page: The official Facebook or Meta Business Page that will be displayed as the sponsor of the ad.
- Click Save Ads to complete setup.
Still need assistance? Please reach out to your Customer Success Team or contact support@tradablebits.com