---
title: Getting Started with Importing Registration Data
description: Learn how to manually import historical or standalone registration data into Tradable Bits using CSV files, from field mapping to final report generation.
---
[Skip to content](https://resources.tradablebits.com/support/getting-started-with-importing-registration-data#main-content)
English
Show submenu for translations
![tradable-bits-long-logo-for-download.png\]](https://resources.tradablebits.com/hs-fs/hubfs/tradable-bits-long-logo-for-download.png?height=40&name=tradable-bits-long-logo-for-download.png)
Open main navigation
Close main navigation
- English
Show submenu for translations
How can we help?
- There are no suggestions because the search field is empty.
1. [Resources](https://resources.tradablebits.com/support?hsLang=en)
2. [Sales](https://resources.tradablebits.com/support/sales?hsLang=en)
# Getting Started with Importing Registration Data
## Connect your off-platform attendee, RFID, and event registration data directly into the Tradable Bits ecosystem
While most registration data syncs automatically via third-party integrations (viewable under **Sales \> Setup**), you can manually import historical or standalone registration data (e.g., wristband, RFID, or external event check-ins) using CSV files.
### How to Import Registration Data
#### Step 1: Upload Your CSV File
Navigate to **Sales \> Import** and choose **Registration Import**. Click **Import** and select your CSV file.
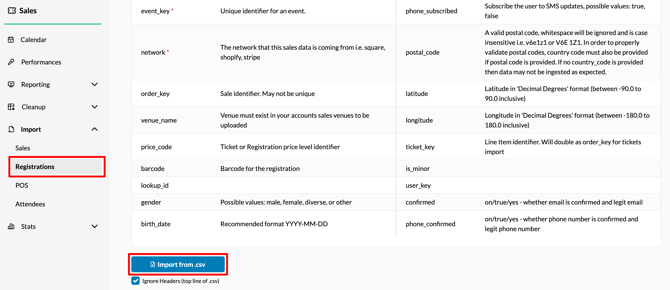
Name your CSV header columns to match the standard Tradable Bits field names. The system will automatically match your columns on upload.
#### Step 2: Match Your Appropriate Fields
Once you upload your CSV file, you will be directed to the **Import Review** page.
This page details the total number of rows pulled in from your CSV file and indicates whether your file meets mandatory requirements.
**Mandatory Fields for registration import include:**
- email
- registration\_key
- event\_date (recommended format: YYYY-MM-DD)
- registration\_date (recommended format: YYYY-MM-DD)
- event\_name
- event\_key
- network
- first\_name
- last\_name
**Matching Fields:**
- Match your CSV column headers to the appropriate Tradable Bits data fields using the dropdown menus.
- If you do not want to import a certain column or cannot find an appropriate match, select **Ignore** as your field.
- **Overwrite Data**: Use the **Overwrite Data →** button next to any column header to apply a single, fixed value across all rows in that column. Enter your desired string in the **Value** field and click **Save** to populate or overwrite that entire column for the import.
**Tags & Data Confirmation:**
- Once all relevant columns are matched, you have the option to tag fans in this CSV file with a previously created tag and/or tie these fans to a specific campaign.
- To confirm your upload, tick the mandatory checkbox declaring that the imported CSV is first-party data owned by your organization.
#### Step 3: Click Confirm
Click **Confirm** at the bottom of the page. Once your upload is complete, you will be directed to an import summary page that details the total registrations processed, new entries, existing records, and any errors in your CSV file, by row number. Review your import and address any outstanding errors before proceeding.
#### Step 4: Complete Import
Once you are satisfied with your import data, click **Complete**. You will be redirected to the **Registration Stats** page where you can verify your imported data with a quick search:
1. Go to **Source** and select **Import** from the dropdown menu.
2. Click **Generate Sales Report** to view the information associated with your CSV import.
Take a look at our guide, [How to pull a Registration Stats Report,](https://resources.tradablebits.com/support/how-do-i-pull-a-registration-stats-report?hsLang=en) for more information.
**Still need assistance? Please reach out to your Customer Success Team or contact [support@tradablebits.com](mailto:support@tradablebits.com)**
- [Getting started](https://resources.tradablebits.com/support/getting-started?hsLang=en)
- [Account](https://resources.tradablebits.com/support/account?hsLang=en#main-content)
- [Security](https://resources.tradablebits.com/support/account?hsLang=en#security)
- [Integrations](https://resources.tradablebits.com/support/integrations?hsLang=en#main-content)
- [Outgoing Integrations](https://resources.tradablebits.com/support/integrations?hsLang=en#outgoing-integrations)
- [Incoming Integrations](https://resources.tradablebits.com/support/integrations?hsLang=en#incoming-integrations)
- [Salesforce Marketing Cloud](https://resources.tradablebits.com/support/integrations?hsLang=en#salesforce-marketing-cloud)
- [FAQs](https://resources.tradablebits.com/support/faqs?hsLang=en)
- [Troubleshooting](https://resources.tradablebits.com/support/troubleshooting?hsLang=en#main-content)
- [CSS/JS](https://resources.tradablebits.com/support/troubleshooting?hsLang=en#css-js)
- [Reports](https://resources.tradablebits.com/support/reports?hsLang=en)
- [Engagement Campaigns](https://resources.tradablebits.com/support/engagement-campaigns?hsLang=en#main-content)
- [Campaign Basics](https://resources.tradablebits.com/support/engagement-campaigns?hsLang=en#campaign-basics)
- [Campaign Management](https://resources.tradablebits.com/support/engagement-campaigns?hsLang=en#campaign-management)
- [Creating Campaigns](https://resources.tradablebits.com/support/engagement-campaigns?hsLang=en#creating-campaigns)
- [Best Practices and Troubleshooting](https://resources.tradablebits.com/support/engagement-campaigns?hsLang=en#best-practices-and-troubleshooting)
- [UGC](https://resources.tradablebits.com/support/ugc?hsLang=en)
- [Fan CRM](https://resources.tradablebits.com/support/fan-crm?hsLang=en)
- [Sales](https://resources.tradablebits.com/support/sales?hsLang=en)
- [Idols](https://resources.tradablebits.com/support/idols?hsLang=en)
- [Trackers](https://resources.tradablebits.com/support/trackers?hsLang=en)
- [Messaging](https://resources.tradablebits.com/support/messaging?hsLang=en#main-content)
- [SMS](https://resources.tradablebits.com/support/messaging?hsLang=en#sms)
- [Email](https://resources.tradablebits.com/support/messaging?hsLang=en#email)
- [Push Notifications](https://resources.tradablebits.com/support/messaging?hsLang=en#push-notifications)
- [Instagram](https://resources.tradablebits.com/support/messaging?hsLang=en#instagram)
- [Ads](https://resources.tradablebits.com/support/ads?hsLang=en)
- [Octane](https://resources.tradablebits.com/support/octane?hsLang=en)
- [Product Updates](https://resources.tradablebits.com/support/product-updates?hsLang=en)
[](https://tradablebits.com/)
Copyright © 2026, Tradable Bits